I store my code in three places: on GitHub, on a remote staging server, and on my own computer. This lets me work on my projects from anywhere. In this article, I want to explain my approach. While there are other ways to set up your environment and CI/CD pipeline, this can be a helpful way to start.
First, I set up a Git repository on GitHub to store my code. Then, I clone the same repository onto a remote server. This server acts as a staging server, allowing me to test and run my projects in a live environment.
I also clone the repository onto my local computer or laptop, where I write and edit my code. This way, I can work on my projects even when I'm not connected to the internet.
To connect these three places for CI/CD (Continuous Integration/Continuous Deployment), I typically do a few things:
- I create a sudo user on the remote server.
- I set up SSH keys, which are secret codes that allow me to securely connect to GitHub and the remote server.
- I clone the GitHub repository to my local PC and to the remote server.
- I configure Credential Helpers.
- I use GitHub Actions to create a CI/CD Workflow. This workflow automates tasks like testing my code and deploying it to the remote server whenever I make changes.
Now, whenever I write new code on my local computer and push it to GitHub, the workflow automatically tests the code and deploys it to the remote server if everything is okay. This article will demonstrate just one example of creating a workflow for deploying code. The testing process is similar if you already have testing scripts set up.
Create a sudo user
A sudo user is needed for security reasons. In the context of setting up a CI/CD pipeline, having a sudo user allows you to perform tasks that require elevated permissions, such as installing dependencies or restarting services, without compromising the overall security of the system.
sudo adduser userdeploy
Add the user "userdeploy" to the sudo group:
sudo usermod -aG sudo userdeploy

groups userdeploy
SSH Keys and Secrets
It would be helpful to set up SSH keys to SSH into a remote server and a workflow for GitHub Actions. After you make a new user, use SSH to connect to the server with that user and read this article about how to set up keys for the remote server and for your GitHub repository.
You can copy and paste the contents of the private key to your local computer and then use it to attempt to log in to the remote server. When you use the -i option with the ssh command to specify a private key, the server will attempt to match that private key with a corresponding public key stored in the ~/.ssh/authorized_keys file on the remote server. If a matching public key is found, the server will allow you to authenticate without requiring a password.
ssh -i ~/.ssh/ed25519_userdeploy userdeploy@SSH_HOST
Clone the repo
Let's pretend that we have a GitHub user with login "userdeploy" and we have created a repository with a name "Simple Workflow".
Let's clone the project to the local computer using the web URL - git clone https://github.com/userdeploy/simple-workflow.git or we can do that with a password-protected SSH key - git@github.com:userdeploy/simple-workflow.git.
Also, you've got a virtual private server where your staging website lives in a folder called "/var/www/apps/simple-workflow. Let's pretend that you also "git clone" your project to the "/var/www/apps/" folder.
Let's change the ownership of the directory to avoid the ownership issue:
sudo chown -R userdeploy:userdeploy /var/www/apps/simple-workflow
Credential Helpers
Check out this article about Git Credential Manager (GCM) and learn how to set it up. It's important because it helps manage your login details securely.
After setting up GCM, try manually pulling the latest changes to your staging server when you SSH into it.
/var/www/apps/simple-workflow$ git pull origin main
If you're using Git's credential manager, GitHub won't ask for your username and personal access token every time you use git pull.
The credential manager stores this information securely, so you don't have to type it in each time. It makes using GitHub with Git much easier and faster.
GitHub Actions
After getting everything ready, we can now begin setting up the workflow.
GitHub Actions is a tool that helps you automate tasks, like testing and deploying your code, in a process called CI/CD (Continuous Integration/Continuous Deployment) pipelines. When you push code to GitHub, GitHub Actions can automatically run these pipelines to test your code and deploy it if everything is okay. It's a handy way to make sure your code works well and gets deployed smoothly.
In your GitHub repository, create a new directory named .github/workflows. This is where you'll put your workflow files. After that, inside the .github/workflows directory, create a new file with a name ending in .yml, like deploy.yml. This file will define your workflow.
name: CI/CD Pipeline

on:
  push:
    branches:
      - main

jobs:
  build:
    name: Build
    runs-on: ubuntu-latest
    steps:
    - name: executing remote ssh commands using password
      uses: appleboy/ssh-action@master
      with:
        host: ${{ secrets.SSH_HOST }}
        username: ${{ secrets.SSH_USER }}
        key: ${{ secrets.SSH_PRIVATE_KEY }}
        script: |
          bash /var/www/apps/simple-workflow/deploy.sh
In this simple example of a deploy.yml file, we'll use a bash script to pull from a Git repository:
#!/bin/bash
cd /var/www/apps/simple-workflow/
GPG_TTY=$(tty)
git pull origin main
ls -la
exit
Or you can simply modify this line in the .yml file to make it shorter:
bash "cd /var/www/apps/simple-workflow/ && GPG_TTY=$(tty) && git pull origin main && exit"
That's it!
The "uses:" key in deploy.yml specifies a GitHub Action called ssh-action from the repository "appleboy/ssh-action" located in the master branch.
This action allows you to connect to a server using SSH and run commands.
You can do the same without using the appleboy/ssh-action repository. Instead of using a predefined GitHub Action like ssh-action or simple Ubuntu commands, you can write your own script to achieve the same functionality.
name: CI/CD Pipeline

on:
  push:
    branches:
      - main

jobs:
  deploy:
    runs-on: ubuntu-latest
    steps:
    - name: Start ssh-agent
      env:
        SSH_PRIVATE_KEY: ${{ secrets.SSH_PRIVATE_KEY }}
        SSH_HOST: ${{ secrets.SSH_HOST }}
      run: |
        mkdir -p ~/.ssh
        echo "$SSH_PRIVATE_KEY" > ~/.ssh/id_ed25519
        chmod 600 ~/.ssh/id_ed25519
        eval $(ssh-agent -s)
        ssh-add ~/.ssh/id_ed25519
        ssh-keyscan -t ed25519 $SSH_HOST >> ~/.ssh/known_hosts

    - name: SSH to VPN
      env:
        SSH_HOST: ${{ secrets.SSH_HOST }}
        SSH_USER: ${{ secrets.SSH_USER }}
      run: |
        ssh -i ~/.ssh/id_ed25519 $SSH_USER@$SSH_HOST "bash /var/www/apps/simple-workflow/deploy.sh"
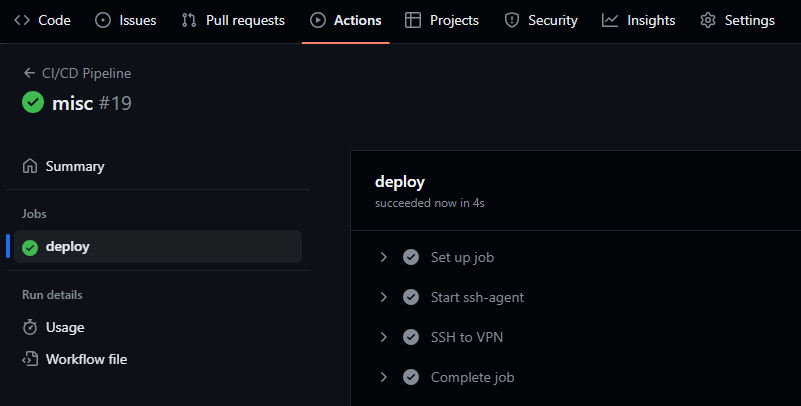
Here is the result:

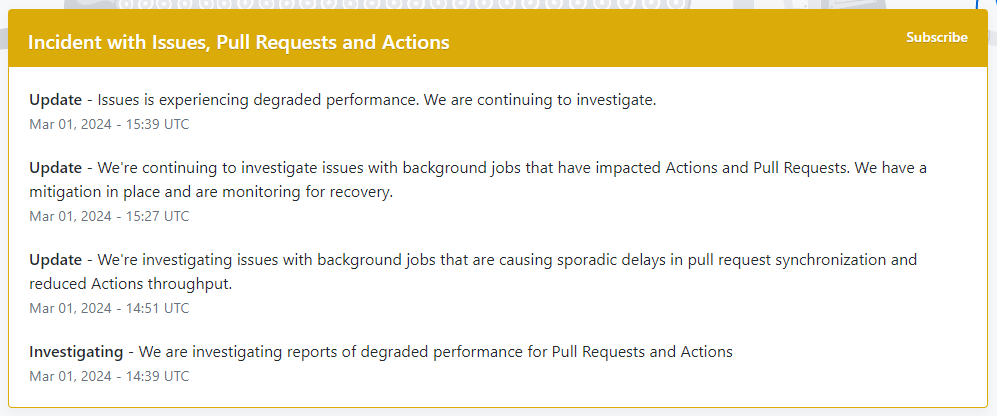
By the way, if something isn't working as expected on GitHub Actions, don't forget to check githubstatus.com. Perhaps the service has issues. This is exactly what recently happened to me.

Also, as of the time of writing this article, it's important to keep in mind the following usage limits for the free tier of GitHub:
- Minutes (per month): 2,000
- Storage: 500 MB
- Total concurrent jobs: 20
- Maximum concurrent macOS jobs: 5
Good luck!
May all your endeavors be successful, and may your code always run smoothly.
Best Regards,
Artem